Wednesday, January 23, 2013

Non-Destructive Cut-Outs

Hi everyone. Today I wanted to share with you a tutorial for how to create non-destructive cut out shapes on a background paper using clipping masks and the Inner Shadow layer style. I know it sounds a little intimidating, but it really is fairly easy once you get the hang of it.

This was a post I wrote for the One Little Bird blog. There is an awesome video tutorial, some tips, and a free action from One Little Bird Designs to help you along.

Read about it here.

Here is the layout I made


Materials: Big Ideas by One Little Bird. Font is Apple Symbols.

Tuesday, January 22, 2013

Cool Hybrid Journals

I have a notebook that I carry around with me in my purse.  I use it to jot notes down, write out directions to places (yes I'm one without gps), and to doodle in when I find myself sitting around waiting somewhere.  I'm nearing the end of the pages in my book and am on the lookout for new journals right now and I'm finding myself pretty picky.  I want it to open a certain way and I want the cover to be cute and pretty but still me too.  I'm having trouble finding any that are just right.

I was reading this post on the Sweet Shoppe blog the other day and was inspired that maybe I should create my own journal.  Check it out - there is tons of inspiration!

http://www.sweetshoppedesigns.com/index.php/2013/01/journals-hybrid-style/

Monday, January 21, 2013

How to Create a Signature

Have you noticed in forums or e-mails how people have created cool signature graphics?  Just the other day I decided that it was time to go and update some of mine.  Let me walk you through the process I used.

*The first trick (and what stumps many people before they even begin) is what size to make it.  There are many ways to do it, but let me share with you my favorite.
-Find a signature that is about the size you like and right click on it and choose "Copy Image."
-In PSE (or your editing program), go to "File - New - Blank File." PSE is cool in that it will assume that you want a new document the size of what you just copied.  The one I copied had the following dimensions: 400 pixels wide, 109 pixels high, 72 pixels per inch.  So I just click "OK."  I don't even have to paste the image because I was only copying it for the size.  If this doesn't work for you you can just create a document about this size.
-Then I go to "Image - Resize Image" and get this box:


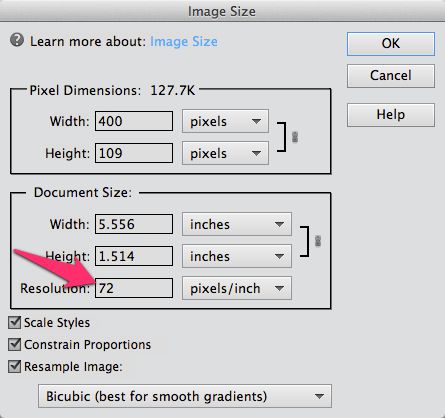
In the box in the center you see that it has width and height in inches and then a resolution box in pixels per inch.  72 pixels per inch is standard for things on the web.  I click in that box and change it to 300 pixels per inch.  It keeps the inches the same but largely increases the pixel width in the top box.  Click "OK."
-Now I have a document that I can work with to create the signature.  The reason I resize it bigger is that I can now use more graphics without having them be so overly large and I can still zoom and adjust things without it getting too blurry.  It also lets me have more flexibility with adding and adjusting  shadows using the presets in PSE.

*The second step is to create the signature.  If you are using digital scrapbooking supplies you will notice that my signature document is still on the small size for some of the graphics so they look super large when put on the page.  There are a couple of ways to get around this.  You could resize your graphic to  something bigger like 600 pixels per inch.  Instead you can resize the graphics smaller either before or after adding them to your signature.

*Once you get the graphic complete you need to resize it small again.  My favorite method is to flatten the image first.  The go back to "Image - Resize Image" and change the 300 back to 72 pixels per inch. Then I also like to sharpen the graphic a bit.

*Next you need to upload your signature to a graphics hosting site like photobucket.

*Finally you need to add your signature where you want.  Most forums have what is called a User CP or some type of settings area.  There you will find a link to "Edit Signature."  Just like in the forums you can often use the picture graphic to add an image to your signature area.  I will work on a tutorial for this soon.

Here are some of the signatures I created last week:

Using Once Upon a Christmas: Believing by Kristin Cronin-Barrow:


Using The Little Things by WM[squared]:


Using Small things by Juno Designs:


Saturday, January 19, 2013

Sharing my Family

I thought I'd take a minute today to share my family with you all.  We had some fabulous pictures taken recently:


I love the way they turned out.  I've already printed a bunch to put up around the house.  Let me introduce you to each one.

Me: Wife. Mom. Teacher. Introvert. Scrapbooker.  I love that I get to be a stay at home mom right now, but one day I hope to go back to teaching elementary or special education.  I love to worship in sign language.  And my favoriate treats are chocolate and coke.

Tim (my husband): He is an amazing Dad and husband.  He teaches middle school math and coaches tennis and basketball.  He is also an amazing musician.

Michael is our oldest.  He has a knack for numbers and is already do math with negative numbers even through he is only 7.  He is a routine boy and likes to have order in his life.  His life however, revolves around sports - watching, playing, talking, thinking, dreaming, you name it.  Here is a layout I did of him a couple of years ago but it is still true.


Jon is 4 now and is my more free spirit creative child.  He never likes to do anything the same way twice.  His favorite toys are cars and he will line them up, race them, and play sports teams with them for hours.  Recently he has also gotten into building things with legos and to his older brothers bafflement is creating things "with 'structions" as he says.


Credits: Big Ideas by One Little Bird, font is Apple Symbols

Then there is our daughter Becca.  She loves stuffed animals and wearing dresses.  She loves to sing an dance, and is really not shy of anything at this point.  She can hold her own with her brothers in a wrestling match and loves to get dirty.  She desperately wishes she could go to school with her big brothers.


Credits: Back to the 80's kit by T for Me Designs, Find Your Bliss Designs, and 2am Designs. Font is Kristi by Darcy Baldwin.

I hope you enjoyed getting to know the four people most precious to me!

Friday, January 18, 2013

Scrapbooking with Evernote

We have been addicted to Evernote in this house.  I'm using it to keep track of recipes, write down project ideas for my kids, writing to do lists, and now tracking some scrapbooking inspiration.  Check it out!


To read a little bit more about it, read my post on KristinCB's blog!

Thursday, January 17, 2013

Some of my favorite recent layouts

Let me share with you some of my favorite layouts I've scrapped recently.


Credits: Count Your Blessings by Juno Designs, template by Cluster Queen Creations.


Credits: Big Ideas by One Little Bird, font is Apple Symbols


Credits: These Moments bundle and Be Inspired - Em template by WM[squared], fonts are Sanvito Pro and Catflish Script Pro.


Credits: Tell Your Story by Juno Designs, font is Marker Felt


Credits: Christmas Countdown by KristinCB and Zoe Pearn, template by Janet Phillips, Title template by Cindy Schneider, font is Caflisch Script

Wednesday, January 16, 2013

Scrap Like Sula template

Check out this great layout:


I was so awed that I wanted to share with you all some tips from Sula who created this layout.  And I made a free template you can download so that you can scrap like Sula.


Click here to read about it and pick up the template on KristinCB's blog!